Photobucket Photobucket Photobucket Photobucket Photobucket Photobucket Photobucket Photobucket Photobucket Photobucket Photobucket Photobucket Photobucket

Beautify your Blog DIY Style… a Dreamy Header!

beautifyyourblog

{Click here for Part 1 on downloading fantabulous free fonts. You’ll need this for later, K?}

In the elusive and highly populated blog-o-sphere, sometimes you only have a fleeting moment to make an impression.

When you only have that nano-second to WOW people and keep them from going automatically to that big, bad, scary X, you need to make sure your Blog Header is SHOW STOPPING!

There are TONS of EASY Header options out there.  Of course, you can always fork out the $$ and get someone else to customize it for you… OR you can be fabulous and create it yourself!

First of all you need to decide if you want a Photo Collage Header or not.  For a Photo Header you can create one ridiculously easy in Picnik or Picasa.  For a more polished look, be sure to leave room for a border around and between your collage header.

Here’s a great tutorial from Clover Lane on making a Photo Header using {free & easy} Picasa.  Don’t forget to use one of the fabulous fonts you downloaded from Part 1!

We are going to focus today on making our own customized NON photo Header.  Anybody can do this, so there is no excuse for not creating your own jaw dropping beautySome of these steps do include blogger specific info since I’m a blogger girl.  Feel free to disregard those parts if you’re not.  :)

One of my FAVORITE secret Bog Design weapons is a SUPER NIFTY photo editing site… Pixlr.com!  It is amazing and easy and FREE!    I do wish I was a photoshop wizard, but alas, I am not.  It is really the poor man’s photoshop, though.   Unlike my other fave, Picnik, Pixlr gives you the ability to use ANY of the fonts {you downloaded} from your computer.  The sky’s the limit, baby!

Step 1… Pick your header image.

Everybody’s gotta start somewhere right?  So start where you’re at.  You don’t wanna shell out the moolah for someone to give you a one of kind header, and maybe you lack the skills to create your own masterpiece… so you find one someone else has graciously shared.  And there are TONS to pick from.  Here are some GREAT places to start looking.  Give yourself a good little while to scroll through and find one that really floats your boat.

If you are installing a complete template with the html code, after you have installed the html, view your blog, right click and copy the header image itself and save it to your computer so you can edit it.

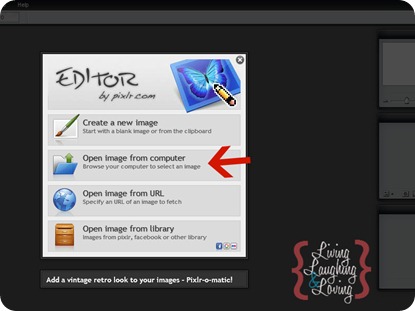
Step 2… Now we are going to upload our header to pixlr.com.  Remember Pixlr is  free and there is not even software to download. You don’t even have to sign up if you don’t want to.  :)

Pixlr is pretty easy, but it is DOES take some getting used to before you’re whipping through projects willy nilly.  It’s set up with the same FEEL as Photoshop but for some reason it’s just so much easier for me.  PLUS… it’s FREE!

Click open image from computer.

pixlr open image 2


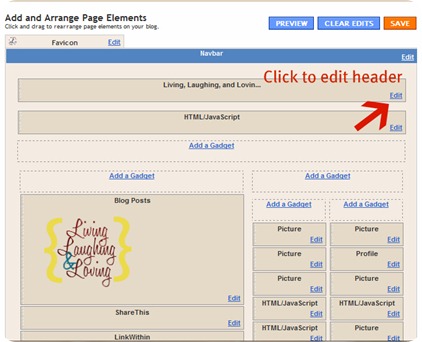
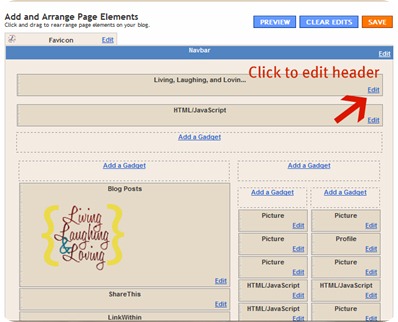
Step 3… Resize to fit the width of  YOUR blog layout.  If you’re in blogger, go to Design, then Page Elements, then Edit under your header to find out how wide your header needs to be.

editheader 2

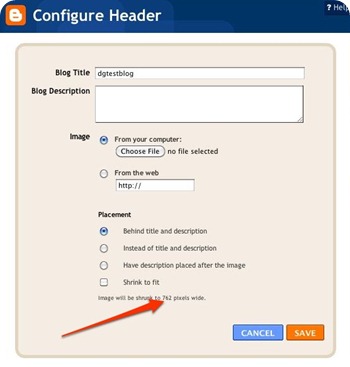
At the bottom look where it says image will be shrunk to 750 {or whatever} pixels.

headersize{via}

That’s how wide your header needs to be.  Click here if you need more tips on figuring out your header size.

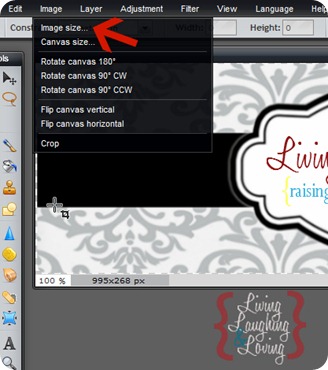
Go back to Pixlr.  Click on image, then image size,

pixlr image size 2

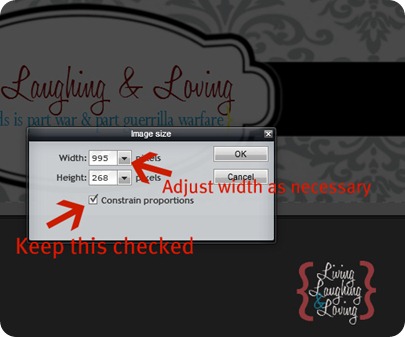
Then adjust the width pixels to that number you determined you needed.  Most of the time you’ll want to keep the box checked so your image will stay in proportion.

pixlr resize 2

Step 4… Now we’re ready to add text!  Click the “A” icon, and then click on your image.

pixlr font 2

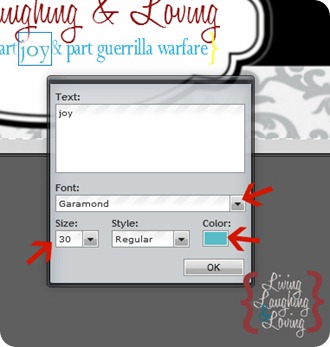
Type your text and adjust the font, size, and color as needed.

pixlr typing font 2

While the pop up box is open, you can click and drag the text box with your mouse to put it exactly where you want it.

Now, to make it look supremely awesome, you’ll need to separate your text into a few DIFFERENT text boxes to either get the text scooched up together better or to use coordinating colors or contrasting fonts.  In most cases, you want to use one part decorative or script font and other part standard, normal type font.   Think about the rest of your blog’s fonts and colors and try to stay semi consistent with your overall theme.

Going back and forth between text boxes to get them in the peeeerfect spot can be tricky, and it took me a while to figure it out, but I will give you the scoop.  :)

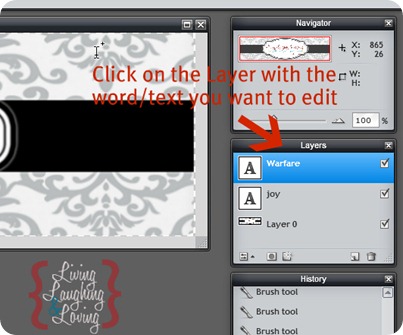
Look to the right for the little box that looks like this

pixlr layers 2

Click on the layer with whatever word you want to edit or move.  Then go back to your image and click on that word.   Wala!

For some reason occasionally when I click on a layer, the whole thing will spontaneously vanish on me.  Ugh!  BUT… all you gotta do then is the super magic UNDO trick… ctrl + z.  Or, you can also go up to the top, click Edit, and then Undo.

FYI… ctrl + z will actually work sometimes even when you’re in a program WITHOUT an undo button.  :)

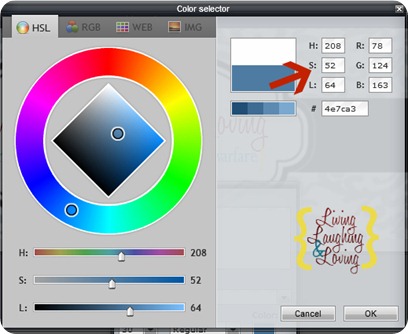
When you have multiple text boxes, but you want all the text to be the SAME color, take note of the number code on the top right of the color box.

pixlr color 2

You could jot it down, but chanting it repeatedly usually works too, ha ha!  After you open a new text box, just type those numbers in and hit okay. Now your colors are matched.  :)

Step 5… When you have your Text just like you want it, go to File, and then Save.  LOOK where you are saving your image, because you will need to find it in a sec.  DON’T CLOSE pixlr though, in case you need to come back and tweak.

Step 6… It’s time to upload your header to your blog. Go back to Blogger, Design tab, Page Elements, and Edit header.

editheader 2

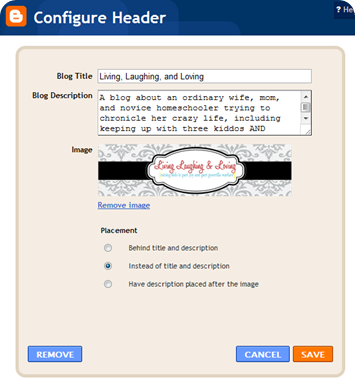
Unclick the box where it says image will be shrunk.

Make sure you click “Instead” of title and description, otherwise your blog info will show up weirdly and randomly over your beautifully crafted header!

header box

Step 7… Cross your fingers, hold your breath, and hit save.

DesignsbyDanaDamask4

If it looks amazing and marvelous and awesome, do a jig and give a squeal.

If it looks retarded and wonky, let out that breath in aggravation and go back to Pixlr for another try.  You were awesome and left it open so all you need to do is adjust the size if that’s the problem or click on the layer of text that needs to be adjusted or whatever.

If you have the annoying blogger border around your header and now it’s too big or too small here’s tips on how to fix that.  It does require some semi in depth tweaking of your HTML which I know CAN be scary!  :)

A BIG part of DIY Blog design is good old TRIAL AND ERROR.  It’s lots of tweaking and adjusting to get things looking FABULOUS!  BUT… it is definitely WORTH IT in the end!

Make sure to let me know if WHEN you try these steps! {You’re DEFINITELY going to try it, right?}  I would love to see the headers you create!   Don’t forget to pick a time when you will be able to really focus on what you’re doing.  This project isn’t going to be a quick one, but remember sometimes you only get a SPLIT SECOND to make a lasting impression on the visitors who stop by your blog.

Make it count!!

Any other great sites to find free and fabulous headers??  Please share!

Stay tuned!  MORE fab stuff coming up in our Beautify your Blog… DIY style series!!

smiley_face_bw-free_thumb

Photobucket

::Sometimes I link to Weekend Bloggy Link up, Tatertots & Jello, House of Hepworths, Delightful Order, Bowl Full of Lemons, Organize & Decorate Everything, This Chick Cooks, Funky Junk Interiors, Craft Envy, Somewhat Simple, Shabby Creek Cottage, No Minimalist Here, Skip to my Lou, Fingerprints on the Fridge, CRAFT, Today’s Creative Blog, and Someday Crafts. You should check ‘em out!!::

26 Responses to Beautify your Blog DIY Style… a Dreamy Header!
  1. Ginger Zuck
    October 28, 2011 | 12:38 pm

    WOW! I am so printing this off. One of these day, I may get brave! Thanks

  2. Nadir@StitchSense
    October 28, 2011 | 1:00 pm

    Hi, I'm visiting from Amanda's party today. You have NO IDEA how badly I needed this post. Headers are the worst for me & I'm always at a loss as to what to do with it. I might just give this a try this weekend! :-) Thanks for sharing, take care! ~Nadir

  3. Beth
    October 28, 2011 | 1:39 pm

    Thanks so much for this tutorial! I am a total blog design dummy, and this makes great sense!

  4. Diana
    October 29, 2011 | 12:28 am

    Thanks for these tips! I'll definitely go and check out your links–I've been wanting to play around with a photo header for awhile. Appreciate the suggestions!

  5. Malinda Jane Sieg
    October 29, 2011 | 1:29 am

    Thanks so much for sharing this! My craft blog is in DIRE need of revamping.

  6. Kelley @ TheGrantLife.com
    October 30, 2011 | 4:40 am

    Hi – found ya on a link party :)
    Thanks for the tutorial! Im trying to create a new layout on my own and its tough work. I can use all the help I can get :) Thank you again!

  7. Southern Fried Gal
    October 31, 2011 | 3:15 am

    Thanks for sharing your tips!

  8. Stephanie
    October 31, 2011 | 11:00 pm

    Thanks for sharing this! I like do things myself too-it saves money!

  9. Sugarr2518
    November 1, 2011 | 2:17 am

    Thanks for the tutorial! I will have to try when I update my blog.

  10. megan {homemade ginger}
    November 2, 2011 | 12:31 pm

    awesome! thanks!!

  11. Evie
    November 3, 2011 | 3:43 am

    This is awesome…thank you! I've been wanting to change my header to something non-photoish but had no idea how to do it! Thanks a million!!!

    evie @ brown paper packages

  12. tastynest
    November 3, 2011 | 2:36 pm

    awesome post! I had no idea this was available for free! Thanks!

  13. Sherry @ No Minimalist Here
    November 3, 2011 | 10:45 pm

    Hi Renee, Great post! Thanks for sharing the tutorial at the Open House party.
    xo,
    Sherry

  14. Jen @ The Decor Scene
    November 11, 2011 | 3:45 pm

    Renee….I trying this, just have to find the time to sit down and read it step by step. Thank you, thank you!!! Stopping over from Serenity Now. :)

  15. AJ
    November 16, 2011 | 10:44 pm

    I just used your tips to update my header! It's not where I'd like it to be, but it's a lot better than the plain words I had before. Thanks for this post! Can you tell me how to get new fonts into Pixlr? Their's are a little boring…

  16. Inspire Me Heather
    November 28, 2011 | 12:17 pm

    I liked this tutorial, thanks! I've also linked this to my "blogging" post too today, will you come on over and have a look?

  17. Carrie @ My Favorite Finds
    December 6, 2011 | 5:06 pm

    Thank you so much! I am reading this…and the rest of your series..because I wan to update my blog. Can you tell me, is it possible to change the color scheme on headers? Or on templates? I found some really nice ones from the places you suggested, but they don't really match my blog button very well, and I don't want to change that.

  18. Kim Barker
    December 28, 2011 | 11:39 pm

    wow! I just created my own banner following your directions and it was soooo easy! Thanks for posting!

    http://www.deepsouthernfaith.blogspot.com

  19. Brittany
    January 1, 2012 | 2:23 pm

    I stumbled across your post and you seriously just made my life SO much easier! I just started a cooking blog and am trying to design everything myself. I just made a test header, and it was so easy. Now I can go to sleep, and look forward to working on this tomorrow. Thank you thank you THANK YOU! :)

  20. {Steph}
    January 17, 2012 | 3:28 pm

    Thank you so much! I did this yesterday & am super happy with the results!!

    ~Steph @ Silver Boxes

  21. Littlest Sweet Pea
    January 30, 2012 | 4:06 pm

    OMG! I've been saving this and just now got around to it! Thank you so much for your help. I had a cute tite but it was never the same width as my blog! NOW it is! I've saved all of your beautify blog sections. HUGE HELP!! Feel free to take a look at my blog and see what your help has inspired. Thanks again
    http://www.LittlestSweetPea.com
    I do have a question for you…how do you take pictures of your screen? I'm not sure if that makes sense! How are you able to get jpegs of the actual process that you use on the computer?

  22. Karen At Home
    February 8, 2012 | 2:40 pm

    I found your post from googling how to make a blog header and I can't wait to try it. This is exactly what I have been looking for, especially now that Picnik is leaving us.

    Love your header!

  23. […] Dreamy Header […]

  24. Sarah Carletti
    April 24, 2012 | 6:55 am

    Thanks! I’m following!!!!

  25. Vidya @ Whats Ur Home Story
    April 28, 2012 | 9:31 am

    Love the detailed post. Came here from google while searching for ways to change the header. I have a wordpress blog, any idea who I can change the background for it? I have not found anything on the net so far for wordpress.

    Thank you

  26. […] Living, Laughing, and Loving: Beautify your Blog DIY Style… a Dreamy Header! Renee created  a fantastic tutorial on how to create your own blog header. I always struggled with writing a tutorial on this subject, because I use Adobe Photoshop to do it. This tutorial shows you how to do it without any expensive software. And she shares how to upload it in Blogger. […]

Beautify your Blog DIY Style… a Dreamy Header!

beautifyyourblog

{Click here for Part 1 on downloading fantabulous free fonts. You’ll need this for later, K?}

In the elusive and highly populated blog-o-sphere, sometimes you only have a fleeting moment to make an impression.

When you only have that nano-second to WOW people and keep them from going automatically to that big, bad, scary X, you need to make sure your Blog Header is SHOW STOPPING!

There are TONS of EASY Header options out there.  Of course, you can always fork out the $$ and get someone else to customize it for you… OR you can be fabulous and create it yourself!

First of all you need to decide if you want a Photo Collage Header or not.  For a Photo Header you can create one ridiculously easy in Picnik or Picasa.  For a more polished look, be sure to leave room for a border around and between your collage header.

Here’s a great tutorial from Clover Lane on making a Photo Header using {free & easy} Picasa.  Don’t forget to use one of the fabulous fonts you downloaded from Part 1!

We are going to focus today on making our own customized NON photo Header.  Anybody can do this, so there is no excuse for not creating your own jaw dropping beautySome of these steps do include blogger specific info since I’m a blogger girl.  Feel free to disregard those parts if you’re not.  :)

One of my FAVORITE secret Bog Design weapons is a SUPER NIFTY photo editing site… Pixlr.com!  It is amazing and easy and FREE!    I do wish I was a photoshop wizard, but alas, I am not.  It is really the poor man’s photoshop, though.   Unlike my other fave, Picnik, Pixlr gives you the ability to use ANY of the fonts {you downloaded} from your computer.  The sky’s the limit, baby!

Step 1… Pick your header image.

Everybody’s gotta start somewhere right?  So start where you’re at.  You don’t wanna shell out the moolah for someone to give you a one of kind header, and maybe you lack the skills to create your own masterpiece… so you find one someone else has graciously shared.  And there are TONS to pick from.  Here are some GREAT places to start looking.  Give yourself a good little while to scroll through and find one that really floats your boat.

If you are installing a complete template with the html code, after you have installed the html, view your blog, right click and copy the header image itself and save it to your computer so you can edit it.

Step 2… Now we are going to upload our header to pixlr.com.  Remember Pixlr is  free and there is not even software to download. You don’t even have to sign up if you don’t want to.  :)

Pixlr is pretty easy, but it is DOES take some getting used to before you’re whipping through projects willy nilly.  It’s set up with the same FEEL as Photoshop but for some reason it’s just so much easier for me.  PLUS… it’s FREE!

Click open image from computer.

pixlr open image 2


Step 3… Resize to fit the width of  YOUR blog layout.  If you’re in blogger, go to Design, then Page Elements, then Edit under your header to find out how wide your header needs to be.

editheader 2

At the bottom look where it says image will be shrunk to 750 {or whatever} pixels.

headersize{via}

That’s how wide your header needs to be.  Click here if you need more tips on figuring out your header size.

Go back to Pixlr.  Click on image, then image size,

pixlr image size 2

Then adjust the width pixels to that number you determined you needed.  Most of the time you’ll want to keep the box checked so your image will stay in proportion.

pixlr resize 2

Step 4… Now we’re ready to add text!  Click the “A” icon, and then click on your image.

pixlr font 2

Type your text and adjust the font, size, and color as needed.

pixlr typing font 2

While the pop up box is open, you can click and drag the text box with your mouse to put it exactly where you want it.

Now, to make it look supremely awesome, you’ll need to separate your text into a few DIFFERENT text boxes to either get the text scooched up together better or to use coordinating colors or contrasting fonts.  In most cases, you want to use one part decorative or script font and other part standard, normal type font.   Think about the rest of your blog’s fonts and colors and try to stay semi consistent with your overall theme.

Going back and forth between text boxes to get them in the peeeerfect spot can be tricky, and it took me a while to figure it out, but I will give you the scoop.  :)

Look to the right for the little box that looks like this

pixlr layers 2

Click on the layer with whatever word you want to edit or move.  Then go back to your image and click on that word.   Wala!

For some reason occasionally when I click on a layer, the whole thing will spontaneously vanish on me.  Ugh!  BUT… all you gotta do then is the super magic UNDO trick… ctrl + z.  Or, you can also go up to the top, click Edit, and then Undo.

FYI… ctrl + z will actually work sometimes even when you’re in a program WITHOUT an undo button.  :)

When you have multiple text boxes, but you want all the text to be the SAME color, take note of the number code on the top right of the color box.

pixlr color 2

You could jot it down, but chanting it repeatedly usually works too, ha ha!  After you open a new text box, just type those numbers in and hit okay. Now your colors are matched.  :)

Step 5… When you have your Text just like you want it, go to File, and then Save.  LOOK where you are saving your image, because you will need to find it in a sec.  DON’T CLOSE pixlr though, in case you need to come back and tweak.

Step 6… It’s time to upload your header to your blog. Go back to Blogger, Design tab, Page Elements, and Edit header.

editheader 2

Unclick the box where it says image will be shrunk.

Make sure you click “Instead” of title and description, otherwise your blog info will show up weirdly and randomly over your beautifully crafted header!

header box

Step 7… Cross your fingers, hold your breath, and hit save.

DesignsbyDanaDamask4

If it looks amazing and marvelous and awesome, do a jig and give a squeal.

If it looks retarded and wonky, let out that breath in aggravation and go back to Pixlr for another try.  You were awesome and left it open so all you need to do is adjust the size if that’s the problem or click on the layer of text that needs to be adjusted or whatever.

If you have the annoying blogger border around your header and now it’s too big or too small here’s tips on how to fix that.  It does require some semi in depth tweaking of your HTML which I know CAN be scary!  :)

A BIG part of DIY Blog design is good old TRIAL AND ERROR.  It’s lots of tweaking and adjusting to get things looking FABULOUS!  BUT… it is definitely WORTH IT in the end!

Make sure to let me know if WHEN you try these steps! {You’re DEFINITELY going to try it, right?}  I would love to see the headers you create!   Don’t forget to pick a time when you will be able to really focus on what you’re doing.  This project isn’t going to be a quick one, but remember sometimes you only get a SPLIT SECOND to make a lasting impression on the visitors who stop by your blog.

Make it count!!

Any other great sites to find free and fabulous headers??  Please share!

Stay tuned!  MORE fab stuff coming up in our Beautify your Blog… DIY style series!!

smiley_face_bw-free_thumb

Photobucket

::Sometimes I link to Weekend Bloggy Link up, Tatertots & Jello, House of Hepworths, Delightful Order, Bowl Full of Lemons, Organize & Decorate Everything, This Chick Cooks, Funky Junk Interiors, Craft Envy, Somewhat Simple, Shabby Creek Cottage, No Minimalist Here, Skip to my Lou, Fingerprints on the Fridge, CRAFT, Today’s Creative Blog, and Someday Crafts. You should check ‘em out!!::

26 Responses to Beautify your Blog DIY Style… a Dreamy Header!
  1. Ginger Zuck
    October 28, 2011 | 12:38 pm

    WOW! I am so printing this off. One of these day, I may get brave! Thanks

  2. Nadir@StitchSense
    October 28, 2011 | 1:00 pm

    Hi, I'm visiting from Amanda's party today. You have NO IDEA how badly I needed this post. Headers are the worst for me & I'm always at a loss as to what to do with it. I might just give this a try this weekend! :-) Thanks for sharing, take care! ~Nadir

  3. Beth
    October 28, 2011 | 1:39 pm

    Thanks so much for this tutorial! I am a total blog design dummy, and this makes great sense!

  4. Diana
    October 29, 2011 | 12:28 am

    Thanks for these tips! I'll definitely go and check out your links–I've been wanting to play around with a photo header for awhile. Appreciate the suggestions!

  5. Malinda Jane Sieg
    October 29, 2011 | 1:29 am

    Thanks so much for sharing this! My craft blog is in DIRE need of revamping.

  6. Kelley @ TheGrantLife.com
    October 30, 2011 | 4:40 am

    Hi – found ya on a link party :)
    Thanks for the tutorial! Im trying to create a new layout on my own and its tough work. I can use all the help I can get :) Thank you again!

  7. Southern Fried Gal
    October 31, 2011 | 3:15 am

    Thanks for sharing your tips!

  8. Stephanie
    October 31, 2011 | 11:00 pm

    Thanks for sharing this! I like do things myself too-it saves money!

  9. Sugarr2518
    November 1, 2011 | 2:17 am

    Thanks for the tutorial! I will have to try when I update my blog.

  10. megan {homemade ginger}
    November 2, 2011 | 12:31 pm

    awesome! thanks!!

  11. Evie
    November 3, 2011 | 3:43 am

    This is awesome…thank you! I've been wanting to change my header to something non-photoish but had no idea how to do it! Thanks a million!!!

    evie @ brown paper packages

  12. tastynest
    November 3, 2011 | 2:36 pm

    awesome post! I had no idea this was available for free! Thanks!

  13. Sherry @ No Minimalist Here
    November 3, 2011 | 10:45 pm

    Hi Renee, Great post! Thanks for sharing the tutorial at the Open House party.
    xo,
    Sherry

  14. Jen @ The Decor Scene
    November 11, 2011 | 3:45 pm

    Renee….I trying this, just have to find the time to sit down and read it step by step. Thank you, thank you!!! Stopping over from Serenity Now. :)

  15. AJ
    November 16, 2011 | 10:44 pm

    I just used your tips to update my header! It's not where I'd like it to be, but it's a lot better than the plain words I had before. Thanks for this post! Can you tell me how to get new fonts into Pixlr? Their's are a little boring…

  16. Inspire Me Heather
    November 28, 2011 | 12:17 pm

    I liked this tutorial, thanks! I've also linked this to my "blogging" post too today, will you come on over and have a look?

  17. Carrie @ My Favorite Finds
    December 6, 2011 | 5:06 pm

    Thank you so much! I am reading this…and the rest of your series..because I wan to update my blog. Can you tell me, is it possible to change the color scheme on headers? Or on templates? I found some really nice ones from the places you suggested, but they don't really match my blog button very well, and I don't want to change that.

  18. Kim Barker
    December 28, 2011 | 11:39 pm

    wow! I just created my own banner following your directions and it was soooo easy! Thanks for posting!

    http://www.deepsouthernfaith.blogspot.com

  19. Brittany
    January 1, 2012 | 2:23 pm

    I stumbled across your post and you seriously just made my life SO much easier! I just started a cooking blog and am trying to design everything myself. I just made a test header, and it was so easy. Now I can go to sleep, and look forward to working on this tomorrow. Thank you thank you THANK YOU! :)

  20. {Steph}
    January 17, 2012 | 3:28 pm

    Thank you so much! I did this yesterday & am super happy with the results!!

    ~Steph @ Silver Boxes

  21. Littlest Sweet Pea
    January 30, 2012 | 4:06 pm

    OMG! I've been saving this and just now got around to it! Thank you so much for your help. I had a cute tite but it was never the same width as my blog! NOW it is! I've saved all of your beautify blog sections. HUGE HELP!! Feel free to take a look at my blog and see what your help has inspired. Thanks again
    http://www.LittlestSweetPea.com
    I do have a question for you…how do you take pictures of your screen? I'm not sure if that makes sense! How are you able to get jpegs of the actual process that you use on the computer?

  22. Karen At Home
    February 8, 2012 | 2:40 pm

    I found your post from googling how to make a blog header and I can't wait to try it. This is exactly what I have been looking for, especially now that Picnik is leaving us.

    Love your header!

  23. […] Dreamy Header […]

  24. Sarah Carletti
    April 24, 2012 | 6:55 am

    Thanks! I’m following!!!!

  25. Vidya @ Whats Ur Home Story
    April 28, 2012 | 9:31 am

    Love the detailed post. Came here from google while searching for ways to change the header. I have a wordpress blog, any idea who I can change the background for it? I have not found anything on the net so far for wordpress.

    Thank you

  26. […] Living, Laughing, and Loving: Beautify your Blog DIY Style… a Dreamy Header! Renee created  a fantastic tutorial on how to create your own blog header. I always struggled with writing a tutorial on this subject, because I use Adobe Photoshop to do it. This tutorial shows you how to do it without any expensive software. And she shares how to upload it in Blogger. […]