Photobucket Photobucket Photobucket Photobucket Photobucket Photobucket Photobucket Photobucket Photobucket Photobucket Photobucket Photobucket Photobucket

Beautify your Blog, DIY… EASY Watermark Image!

beautifyyourblog

Welcome to PART FIVE of our Beautify your Blog, DIY style Series!  Make sure you catch up on…

I am SO psyched about this one.  This one is SO important.  Especially now, in the days where everyone is blogging, fb’ing, tweeting, and pinning like mad

No matter if you are big or small the expert peeps say you should always PROTECT your photos with a watermark.

The internet has been abuzz lately with what is the rights and wrongs of blogging/pinning ethics, but bottom line… if your pics are watermarked then you are one step ahead of the game. 

Alison from House of Hepworths told a very sad tale of how her un-watermarked pics were taken and used without her permission or knowledge. 

So have I convinced you yet?  Watermarking is IMPORTANT!  

I don’t really have much room to “preach” about it though, since I JUST started trying to watermark mine.  To me it was just TOO MUCH hassle to add it to EVERY STINKING picture. 

I liked how some people’s watermarks looked more like a graphic, and through MUCHO trial and error ended up creating my very own that I can add to my pictures in Picnik in about 2 seconds flat!

Wanna know more??

Okay… Step 1… Open Pixlr… Are you starting to figure out this is where we’re going to spend our time??  I have to say again that I heart Pixlr!!  It’s so easy and user friendly!!  Free and NO software to download…

Choose Create New Image.

createnewimage2

Choose the size you want your signature to be.  200 x 200 might be a good place to start.  Make sure you click “Transparent.”

changesize3


Step 2… Click “A” to add your text.  We will need our text as tight and smushed together as possible, so add a text box for every word in your title so it can be adjusted as need be. 

{Click in the layers box on the right to go back and forth between text boxes.}

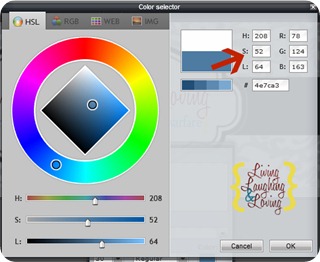
Remember to look at the color number code up at the top.  You’ll need to type this in on all your text boxes so your colors will match.

               pixlr font 2                 pixlr color 2

Hint… First, choose Light colors for your text that will show up on a dark background.  Then go back and change everything to dark colors that will show up well on a lighter background.


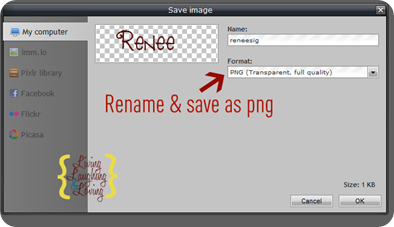
Step 3… Save as png.  We want it to be a png since it needs to be transparent.

saveaspng2

You should have TWO versions saved now.  Your light version and your dark version.

                               LLL Watermark light         LLL Watermark


Step 4… Upload both watermarks to Picnik and immediately save again as a png.

saveas a png2


Step 5… Now we get to strut our stuff and add our beautiful watermark!!!  Open any image in Picnik.  Click the arrow on the bottom left corner to expand the Photo Basket.

picnik photo basket 2


Step 6… Find your watermark/s in the photo basket.

picnik choose pic in photo basket 2

Click on the watermark you want, and drag it up to your picture.


Step 7… Adjust watermark size, and fade if needed.  If your picture happens to have an uneven color background going on, you can choose “Add” under the Advanced Blend Mode to help it be more readable. 

picnik add blend 2

Most of the time, the only thing I adjust is the size, so it literally takes me TWO seconds.  My only problem is just REMEMBERING to do it!

I usually edit all my blog pics in picnik anyway, so the only extra step in adding the watermark for me is the quick click on the photo basket. 


Step 8… SAVE and you’re done!

A BEAUTIFULLY watermarked pic!!!

DSC_0015 2


Hope you’re enjoying these DIY tips!!  If you aren’t… then sorry!!  Please hang in there with me anyway, okay?  :)

I hope you are though, because lots more Beautiful Blog DIY Design coming down the pike!!  So stay tuned!

smiley_face_bw-free_thumb_thumb_thumb

Photobucket

::Sometimes I link to Weekend Bloggy Link up, Tatertots & Jello, House of Hepworths, Delightful Order, Bowl Full of Lemons, Organize & Decorate Everything, Reasons to Skip the Housework, This Chick Cooks, Funky Junk Interiors, Craft Envy, Somewhat Simple, Shabby Creek Cottage, No Minimalist Here, Skip to my Lou, Fingerprints on the Fridge,CRAFT,Today’s Creative Blog, Thrifty Décor Chick, CSI Project, and Someday Crafts. You should check ‘em out!!:

24 Responses to Beautify your Blog, DIY… EASY Watermark Image!
  1. Maury
    November 18, 2011 | 1:32 pm

    This is so helpful! I've been trying to figure out how to do this. Thanks so much!

  2. Maury
    November 18, 2011 | 1:37 pm

    Yep I'm back… on the next one, maybe you could show us how to do the little Facebook, Pinterest, Twitter, etc. icons?

  3. Jen @ The Decor Scene
    November 18, 2011 | 4:26 pm

    This is super easy!!! Thank you for sharing. I have to start doing this all the time now. Thanks! :)

  4. Leah homeandheartstrings@gmail.com
    November 18, 2011 | 5:21 pm

    I've been wanting to do this for awhile, but I figured it was difficult…thanks for the tips!

  5. Sherri
    November 19, 2011 | 4:15 am

    I hafta admit… I'm just TOO darn lazy! LOL

    I'd gotten in the habit of it a while back… 'cuz ALL the "big bloggers" do it ;-) but then I got lazy again.

    Plus, I've never really thought of my stuff as anything that anyone would want to snag… But I think I might just hafta try it your way, 'cuz it seems MUCH easier!

  6. Orphaned Decor
    November 21, 2011 | 9:27 am

    I can't get the photo basket to come up after I have uploaded my pics…..I have no idea what I am doing wrong.

  7. Renee@LivingLaughingLoving
    November 21, 2011 | 2:13 pm

    Ugh! I've realized that the photo basket must be a premium feature of picnik! :( I think you could do something similar in pixlr by clicking to upload image as layer. Then you should be able to add your watermark as a layer on whatever pic you uploaded. I'll need to try it out and see if that works!!

    So sorry I led you astray! I didn't realize the photo basket was a premium feature!! ( I think premium def is worth considering tho if you think you'll be using it a lot!) :)

  8. Rhonda @ Abide at Home
    November 21, 2011 | 6:31 pm

    Man – I know I need to do this, but it seems like such a hassle! Thanks for a step-by-step tutorial. I'm new to blogging and there is SO much to learn! Now, to go make a pretty watermark… :)

  9. Abbey D.
    November 29, 2011 | 1:04 pm

    OH MY GOSH, I'm so glad I found you through The Creative Blog link party. I SO needed this tutorial. New follower!

  10. Sallie
    November 29, 2011 | 4:49 pm

    Thanks so much for this tutorial. I always watermark my photos, but it takes time to do each one. I'm going to consider getting premium Picnik now.
    I found you at Today's Creative Blog.

  11. Scattered Thoughts of a Crafty Mom
    November 29, 2011 | 7:26 pm

    Great post, I have been thinking about doing this as well…
    ~JamieS

  12. Vicky
    November 30, 2011 | 12:36 am

    This is a great help! Thanks, I had been wondering how to do this. I am stumbling this post. I am a new GFC, FB and Twitter follower from Reasons to Skip the Housework. Vicky from Mess For Less

  13. Dusty Coyote
    December 1, 2011 | 4:39 pm

    Thanks for the great and simple tutorial. I'll give it a try.

  14. karah
    December 1, 2011 | 5:10 pm

    This is great information. I NEED to do this. Allison's post was so sad. Thank you so much for sharing.
    Karah @ thespacebetweenblog

  15. {Junk in their Trunk}
    December 1, 2011 | 10:22 pm

    I needed this tutorial!! Thank you for sharing!! I would love for you to come share this at our link party…junkintheirtrunk.blogspot.com/2011/11/link-it-up-wednesday-5.html

  16. Sherry @ No Minimalist Here
    December 6, 2011 | 2:05 am

    Hi Renee, Thanks for sharing the tutorial at the Open House Party. I believe it is important to watermark all photos I just have to get in the habit of doing it on each one.
    xo,
    Sherry

  17. Laura Beth
    December 6, 2011 | 11:26 am

    I never thought of doing it this way!! Thanks so much :o)

  18. katie
    January 23, 2012 | 7:37 am

    hi im loving your new series will be trying thee out for sure! ;) could you show us how to do the icons for facebook,twitter ect please i can't get mine to work.

  19. Claire
    March 15, 2012 | 9:05 am

    I had NO idea this was how to watermark your images! I have just been adding the web address of my blog to my pictures with the text button in Picnik. I’m excited to try to create something a little fancier and give this a try!

    Thanks for all the detailed blogging tips. I look forward to reading the rest.

    Claire

  20. Erin
    March 23, 2012 | 2:00 pm

    Thank you so much for sharing all of these strategies! I am wondering if you can help me with the light watermark on the dark photos. I can’t seem to adjust it to be transparent and still show the watermark once I’m in picnik. Any tips?

    • Renee
      March 27, 2012 | 7:55 am

      For the light version, make your text and graphics white or light colored so they will show up on a dark background.
      That’s the plus to having two versions… a light colored one you can use on dark backgrounds and a dark colored one on light backgrounds.

  21. Miss Kitty
    April 26, 2012 | 12:38 pm

    Yikes! Now that Picnik is closed, do you have an alternative suggestion for a site to save a easy to add watermark in? Photobucket? I just hate downloading a picture two or three times to add different things/edit/etc. Does the new Pic Monkey have this feature?

    • Chatty Claire
      May 31, 2012 | 12:11 pm

      I found PicMonkey to be a very good option for me to watermark. I’ve just begun playing with PicMonkey, but I’m very pleased so far!

  22. Anders Pedersen
    April 7, 2013 | 11:13 am

    Hi

    I have made a watermarking software – TSR Watermark Image that is free for personal use!

    Learn more about how to watermark your photos using it at http://www.watermark-image.com

    Regards
    Anders Pedersen

Beautify your Blog, DIY… EASY Watermark Image!

beautifyyourblog

Welcome to PART FIVE of our Beautify your Blog, DIY style Series!  Make sure you catch up on…

I am SO psyched about this one.  This one is SO important.  Especially now, in the days where everyone is blogging, fb’ing, tweeting, and pinning like mad

No matter if you are big or small the expert peeps say you should always PROTECT your photos with a watermark.

The internet has been abuzz lately with what is the rights and wrongs of blogging/pinning ethics, but bottom line… if your pics are watermarked then you are one step ahead of the game. 

Alison from House of Hepworths told a very sad tale of how her un-watermarked pics were taken and used without her permission or knowledge. 

So have I convinced you yet?  Watermarking is IMPORTANT!  

I don’t really have much room to “preach” about it though, since I JUST started trying to watermark mine.  To me it was just TOO MUCH hassle to add it to EVERY STINKING picture. 

I liked how some people’s watermarks looked more like a graphic, and through MUCHO trial and error ended up creating my very own that I can add to my pictures in Picnik in about 2 seconds flat!

Wanna know more??

Okay… Step 1… Open Pixlr… Are you starting to figure out this is where we’re going to spend our time??  I have to say again that I heart Pixlr!!  It’s so easy and user friendly!!  Free and NO software to download…

Choose Create New Image.

createnewimage2

Choose the size you want your signature to be.  200 x 200 might be a good place to start.  Make sure you click “Transparent.”

changesize3


Step 2… Click “A” to add your text.  We will need our text as tight and smushed together as possible, so add a text box for every word in your title so it can be adjusted as need be. 

{Click in the layers box on the right to go back and forth between text boxes.}

Remember to look at the color number code up at the top.  You’ll need to type this in on all your text boxes so your colors will match.

               pixlr font 2                 pixlr color 2

Hint… First, choose Light colors for your text that will show up on a dark background.  Then go back and change everything to dark colors that will show up well on a lighter background.


Step 3… Save as png.  We want it to be a png since it needs to be transparent.

saveaspng2

You should have TWO versions saved now.  Your light version and your dark version.

                               LLL Watermark light         LLL Watermark


Step 4… Upload both watermarks to Picnik and immediately save again as a png.

saveas a png2


Step 5… Now we get to strut our stuff and add our beautiful watermark!!!  Open any image in Picnik.  Click the arrow on the bottom left corner to expand the Photo Basket.

picnik photo basket 2


Step 6… Find your watermark/s in the photo basket.

picnik choose pic in photo basket 2

Click on the watermark you want, and drag it up to your picture.


Step 7… Adjust watermark size, and fade if needed.  If your picture happens to have an uneven color background going on, you can choose “Add” under the Advanced Blend Mode to help it be more readable. 

picnik add blend 2

Most of the time, the only thing I adjust is the size, so it literally takes me TWO seconds.  My only problem is just REMEMBERING to do it!

I usually edit all my blog pics in picnik anyway, so the only extra step in adding the watermark for me is the quick click on the photo basket. 


Step 8… SAVE and you’re done!

A BEAUTIFULLY watermarked pic!!!

DSC_0015 2


Hope you’re enjoying these DIY tips!!  If you aren’t… then sorry!!  Please hang in there with me anyway, okay?  :)

I hope you are though, because lots more Beautiful Blog DIY Design coming down the pike!!  So stay tuned!

smiley_face_bw-free_thumb_thumb_thumb

Photobucket

::Sometimes I link to Weekend Bloggy Link up, Tatertots & Jello, House of Hepworths, Delightful Order, Bowl Full of Lemons, Organize & Decorate Everything, Reasons to Skip the Housework, This Chick Cooks, Funky Junk Interiors, Craft Envy, Somewhat Simple, Shabby Creek Cottage, No Minimalist Here, Skip to my Lou, Fingerprints on the Fridge,CRAFT,Today’s Creative Blog, Thrifty Décor Chick, CSI Project, and Someday Crafts. You should check ‘em out!!:

24 Responses to Beautify your Blog, DIY… EASY Watermark Image!
  1. Maury
    November 18, 2011 | 1:32 pm

    This is so helpful! I've been trying to figure out how to do this. Thanks so much!

  2. Maury
    November 18, 2011 | 1:37 pm

    Yep I'm back… on the next one, maybe you could show us how to do the little Facebook, Pinterest, Twitter, etc. icons?

  3. Jen @ The Decor Scene
    November 18, 2011 | 4:26 pm

    This is super easy!!! Thank you for sharing. I have to start doing this all the time now. Thanks! :)

  4. Leah homeandheartstrings@gmail.com
    November 18, 2011 | 5:21 pm

    I've been wanting to do this for awhile, but I figured it was difficult…thanks for the tips!

  5. Sherri
    November 19, 2011 | 4:15 am

    I hafta admit… I'm just TOO darn lazy! LOL

    I'd gotten in the habit of it a while back… 'cuz ALL the "big bloggers" do it ;-) but then I got lazy again.

    Plus, I've never really thought of my stuff as anything that anyone would want to snag… But I think I might just hafta try it your way, 'cuz it seems MUCH easier!

  6. Orphaned Decor
    November 21, 2011 | 9:27 am

    I can't get the photo basket to come up after I have uploaded my pics…..I have no idea what I am doing wrong.

  7. Renee@LivingLaughingLoving
    November 21, 2011 | 2:13 pm

    Ugh! I've realized that the photo basket must be a premium feature of picnik! :( I think you could do something similar in pixlr by clicking to upload image as layer. Then you should be able to add your watermark as a layer on whatever pic you uploaded. I'll need to try it out and see if that works!!

    So sorry I led you astray! I didn't realize the photo basket was a premium feature!! ( I think premium def is worth considering tho if you think you'll be using it a lot!) :)

  8. Rhonda @ Abide at Home
    November 21, 2011 | 6:31 pm

    Man – I know I need to do this, but it seems like such a hassle! Thanks for a step-by-step tutorial. I'm new to blogging and there is SO much to learn! Now, to go make a pretty watermark… :)

  9. Abbey D.
    November 29, 2011 | 1:04 pm

    OH MY GOSH, I'm so glad I found you through The Creative Blog link party. I SO needed this tutorial. New follower!

  10. Sallie
    November 29, 2011 | 4:49 pm

    Thanks so much for this tutorial. I always watermark my photos, but it takes time to do each one. I'm going to consider getting premium Picnik now.
    I found you at Today's Creative Blog.

  11. Scattered Thoughts of a Crafty Mom
    November 29, 2011 | 7:26 pm

    Great post, I have been thinking about doing this as well…
    ~JamieS

  12. Vicky
    November 30, 2011 | 12:36 am

    This is a great help! Thanks, I had been wondering how to do this. I am stumbling this post. I am a new GFC, FB and Twitter follower from Reasons to Skip the Housework. Vicky from Mess For Less

  13. Dusty Coyote
    December 1, 2011 | 4:39 pm

    Thanks for the great and simple tutorial. I'll give it a try.

  14. karah
    December 1, 2011 | 5:10 pm

    This is great information. I NEED to do this. Allison's post was so sad. Thank you so much for sharing.
    Karah @ thespacebetweenblog

  15. {Junk in their Trunk}
    December 1, 2011 | 10:22 pm

    I needed this tutorial!! Thank you for sharing!! I would love for you to come share this at our link party…junkintheirtrunk.blogspot.com/2011/11/link-it-up-wednesday-5.html

  16. Sherry @ No Minimalist Here
    December 6, 2011 | 2:05 am

    Hi Renee, Thanks for sharing the tutorial at the Open House Party. I believe it is important to watermark all photos I just have to get in the habit of doing it on each one.
    xo,
    Sherry

  17. Laura Beth
    December 6, 2011 | 11:26 am

    I never thought of doing it this way!! Thanks so much :o)

  18. katie
    January 23, 2012 | 7:37 am

    hi im loving your new series will be trying thee out for sure! ;) could you show us how to do the icons for facebook,twitter ect please i can't get mine to work.

  19. Claire
    March 15, 2012 | 9:05 am

    I had NO idea this was how to watermark your images! I have just been adding the web address of my blog to my pictures with the text button in Picnik. I’m excited to try to create something a little fancier and give this a try!

    Thanks for all the detailed blogging tips. I look forward to reading the rest.

    Claire

  20. Erin
    March 23, 2012 | 2:00 pm

    Thank you so much for sharing all of these strategies! I am wondering if you can help me with the light watermark on the dark photos. I can’t seem to adjust it to be transparent and still show the watermark once I’m in picnik. Any tips?

    • Renee
      March 27, 2012 | 7:55 am

      For the light version, make your text and graphics white or light colored so they will show up on a dark background.
      That’s the plus to having two versions… a light colored one you can use on dark backgrounds and a dark colored one on light backgrounds.

  21. Miss Kitty
    April 26, 2012 | 12:38 pm

    Yikes! Now that Picnik is closed, do you have an alternative suggestion for a site to save a easy to add watermark in? Photobucket? I just hate downloading a picture two or three times to add different things/edit/etc. Does the new Pic Monkey have this feature?

    • Chatty Claire
      May 31, 2012 | 12:11 pm

      I found PicMonkey to be a very good option for me to watermark. I’ve just begun playing with PicMonkey, but I’m very pleased so far!

  22. Anders Pedersen
    April 7, 2013 | 11:13 am

    Hi

    I have made a watermarking software – TSR Watermark Image that is free for personal use!

    Learn more about how to watermark your photos using it at http://www.watermark-image.com

    Regards
    Anders Pedersen