If you are just joining us in our DIY Blog Beautifying Journey, here are all the AMAZING things we’ve covered!
- Fabulous Fonts
- Dreamy Header
- Sensational Signature w/Graphics
- Customized Sidebar Titles
- Easy Watermark Image
- Customized Favicon
- DIY Quote Box
- Adding a Custom Menu Bar
- Sharing your pic on Comments through Gravatar
- Top WordPress Plugins
I’m beginning to think this series could go on forevah! {And fyi… I was able to fix the links that were broken, so feel free to check them all out if you haven’t already!}
Today’s bloggy tip is for Blogger and WordPress alike. I’m sharing a VERY easy way to share that blog you work so hard on. An effortless way to get your name out there.
In your Email Signature.
This way, every email you send will have a nice BEAUTIFUL endorsement of your marvelous blog!
You could always do this simply by going into your email settings and adding a text link to your signature, but I’m sharing a way we can do it with some pizzazz in just TEN easy steps. :)
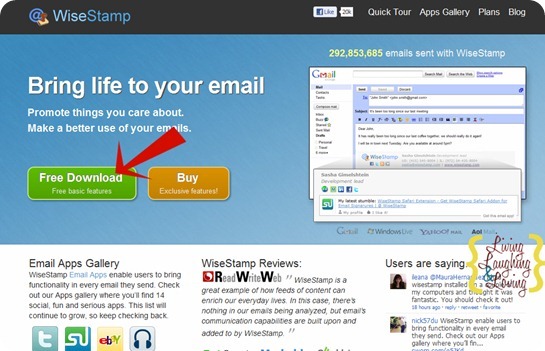
Step 1) Go to WiseStamp.com and click Free Download.
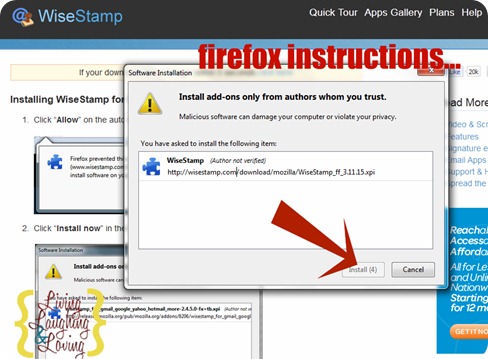
If you are using Firefox, you may see something like this… Click install.
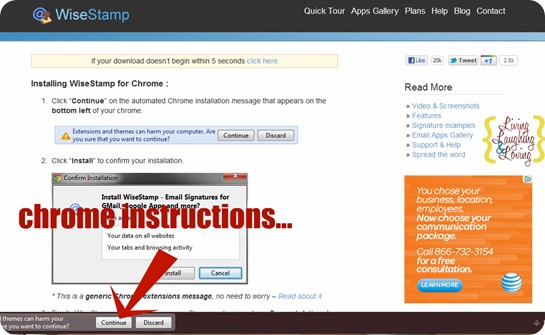
If you’re using Chrome, you may see this… Click Continue.
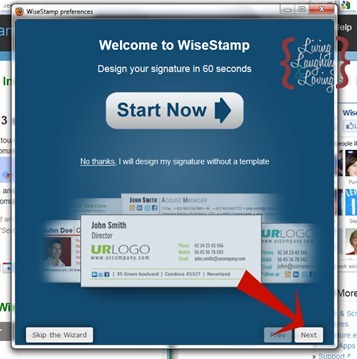
Step 2) Follow the Set up Wizard. It says it will only take you 60 seconds!
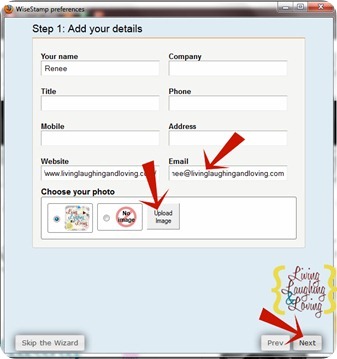
Step 3) Enter any info you want to be included on your signature. Be sure to click “Upload Image” to add your blog button or your pic or whatever else cutie pie attention getting image you want.
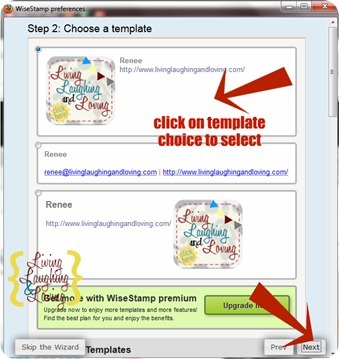
Step 4) Choose your template. Just click anywhere on it to select it and click next.
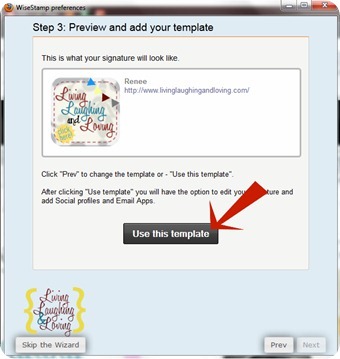
Step 5) Preview and if you are happy, click Use this Template.
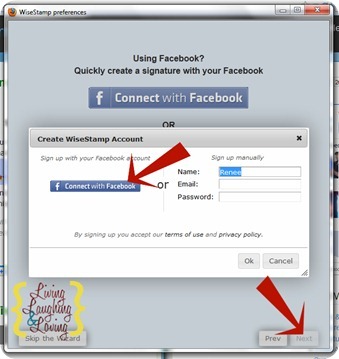
Step 6) Sign in. You might as well go ahead and sign in with facebook since we’ll be adding that button to our signature.
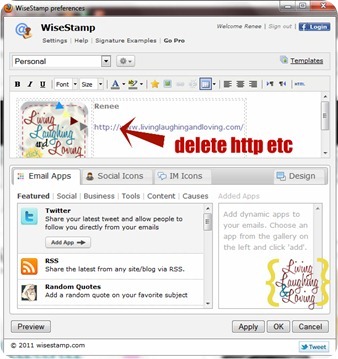
Step 7) This the Edit Template Screen where all the magic happens! Go ahead and delete the http: and the backslash and all that fancy internet stuff. You really could even delete the www and the dot com, and just make your blog name linkable, but I liked showing the url as a visible link to encourage people to CLICK it. :)
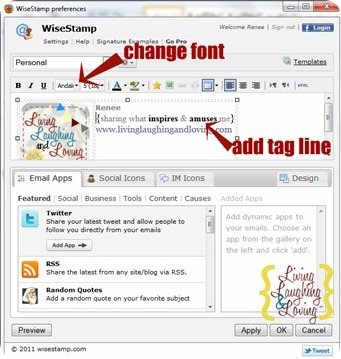
Step 8) Add your blog tag line or whatever message you’d like under your name. Change the font style and size as needed.
You know I’m a font fan. What better word for a decorative font than your signature, right? And Wisestamp doesn’t have the greatest fun choices. So you can add your signature as an image easy peasy!
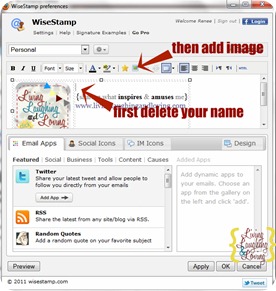
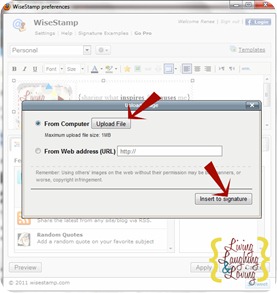
Step 8) Delete name and click to upload image.
If you have already created your signature, just choose upload file and click to insert it in.
If you haven’t created your signature as an image, you can just choose to go with the regular wisestamp supplied font, OR you can follow the incredibly easy steps to create your own signature and bonus… you’ll have an awesome custom siggy to add at the bottom of all your posts too!
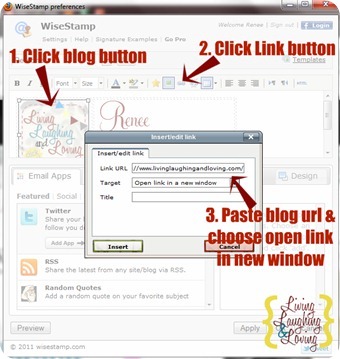
Step 9) Make your blog button linkable. For fun. Just because we can.
Click on your blog button and then click the link button on the toolbar. Paste in your blog url in the pop up window and choose “open link in new window.” Click insert.
Step 10) Now it’s time to add our extra fun social buttons!
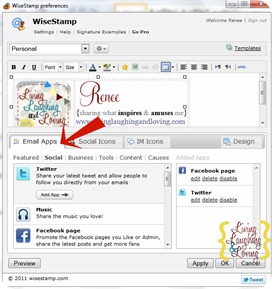
You basically have two choices. Email Apps or Social Icons. I think the Social Icons are the best choice, but you can read on and decide which one you prefer.
The Email Apps will pull in a short blip from whatever page you add like facebook, twitter, or even your blog feed, but it comes with a wisestamp link you can’t remove.
If you choose Email Apps, click on email apps and choose the places you want to share.
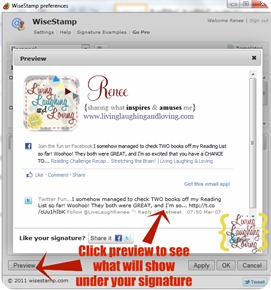
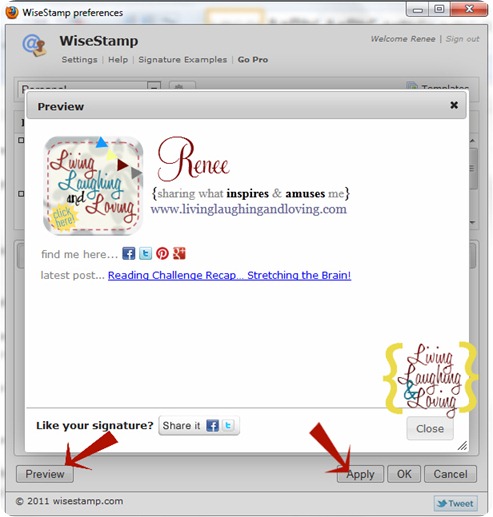
Click Preview to see what your siggy will look like with the choices you’ve added.
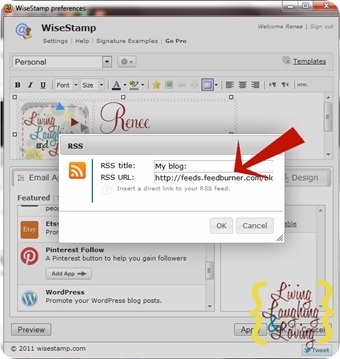
You can also scroll down and click to add the RSS button. You’ll just have to copy and paste in your feedburner url. Click edit on the column on the right to rename it something other than “my blog” or even leave it blank.
This will add the title of your latest blog post as a link underneath your signature!
Now, the downside of using the email app links is #1… I think it clutters up your emails too much, and #2… if you use them it looks like the wisestamp credit link will show up underneath all your emails.
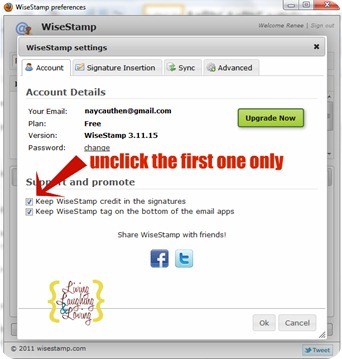
If you choose the Social Icons instead, then you CAN choose to take out the wisestamp link in your signature. Click settings at the top right and uncheck the give credit to wisestamp box on the top.
Now, click on Social Icons, paste in your twitter and facebook urls and click the format button on the bottom left. You can choose to display text only, icon only or text and icon.
You can even add a label in the blank like “find me here.”
I think the icon choice is much cleaner looking and less annoying to have in your emails back and forth to people that the email app choice that shows your latest twitter and facebook posts.
To add more icons than what you see there, click the add button on the bottom left and click the drop down menu to scroll through the list of available choices. I picked facebook, twitter, pinterest, and google+.
When you have added all the email apps and/or social icons you want, hit preview and then apply to save your awesome siggy!
Isn’t is pretty spiffy?
Remember, as with most everything else, less is sometimes more. If I get an email with 5 or 6 lines of a signature, I think my eye somehow automatically glances right over all that info.
Bottom line… don’t go overboard. Make it pretty and to the point.
Now you are ready to use it!!
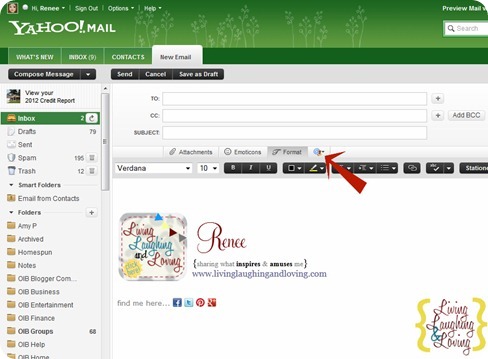
I use this in both yahoo and gmail and have been for quite a while. In gmail, you can find the wisestamp button on the top right.
And in yahoo, it’s right above the toolbar.
When you open a new message, your new and fabulous signature should automatically be there, but you can click those buttons if you want an easy way to edit it.
You always have the option of highlighting and deleting it all if there is ever any email that you don’t feel comfortable sharing your blog info on, fyi.
Purty cool, huh?
Give it a whirl and get your blog out there already.
I’d love to see your finished and fabulous siggy, so shoot me an email when you’re done, k?
Next week I hope to be sharing a ‘losing picnik’ coping tip! So stay tuned! :)
*Sometimes I link up at these parties… Weekend Bloggy Link up, Tatertots & Jello, House of Hepworths,Bowl Full of Lemons,Organize & Decorate Everything, Not Just a Housewife, Funky Junk Interiors, Somewhat Simple, Shabby Creek Cottage, No Minimalist Here, Skip to my Lou,Today’s Creative Blog, the 36th Avenue, Thrifty Décor Chick, Home Stories A-Z, Five Days Five Ways, How to Nest for Less, and Someday Crafts. You should check ‘em out!!








I’m so excited. I just saw this on a friends email and wondered how to get it! This post must have been a lot of work. Thanks for your generosity in sharing!
I wrote a post this week on using the new Fb timeline. Not as detailed as yours but might be of interest. :)
Thank you!! This should be really helpful!
Have I told you lately how much I love this series of yours? I look forward to it every week, and it helps me so much to cope with the “technical” part of blogging. I love your easy to understand tutorials (with pictures!) and appreciate all the hard work you put into them. Thank you.
Aw! You are so sweet! I do tend to go crazy with the arrows and labels, ha ha!! Glad it is a help to you!! I enjoy it!
I love this series, like I told you before this has helped me with my blog a lot. I cannot wait to try this one tonight. It will be great to help me grow my blog and have a wonderful signature too.
Thank you so much for putting the time and effort writing the tutorials.
really good stuff! looking forward to your tips on life after picnik :o)
Love how you put that… ‘life after picnik.’ That would be a great title for my post, huh?! Have you heard about http://www.picmonkey.com ? Just released and looks like it does some awesome things!
Wow, you are such a blogger guru! Someday I plan to implement all your tips. Lately I’ve been just too lazy, ha ha! I do LOVE this series though!
Ha! You definitely have a good reason to RELAX!!! :)
Great tutorial, I’ve bookmarked it so I can come back later!
When I grow up, I hope I am as awesome as you! :)
Thanks for all your help!
I love this! Thanks so much for sharing :)
What great links and love the idea of a signature…must give it a try. Happily following your blog!!
Thanks for this! I had no idea how to get a cool signature and now I’ve got one thanks to you! :)
Very cool!! I need to try this soon. You’re making my to-do list a mile long lately!
I LOVE LOVE your blog and couldn’t remember if I left you a comment to let you know so if you get 2 it’s just extra love.
You’ve been a great help to me with your tutorials .. you have no idea.. Thank you so much. Please stop by and see me sometime.
Carri
simplydonewright.blogspot.com
Wow, what a neat idea! I’m going back to look at all of your other great tips now. Thank you!
Thanks!
I just started following via linky followers. I’d love it if you’d check out my site to see if you’d like to become my newest follower, too!
[…] Promote your Blog with Custom Email Signature […]
[…] Promote your Blog with Custom Email Signature & For Outlook […]
For signature i use Brandmymail ( http://www.brandmymail.com ), which has full control over email signature and overall template :)
Thank you so much, this really helped!
Hi there friends, fastidious post and good arguments commented at this place, I am actually enjoying
by these.