Photobucket Photobucket Photobucket Photobucket Photobucket Photobucket Photobucket Photobucket Photobucket Photobucket Photobucket Photobucket Photobucket

Beautify your Blog Diy Style… A Custom Sig!

beautifyyourblog

{See Part 1 on Fab Fonts & Part 2 on Delicious Dreamy Headers here…}

I mentioned in my Blogging 101 post that it is pretty important to have a signature on all your posts you work so hard to pump out.

Why?

Well, if you don’t feel like clicking over, I’ll tell you again.

Most peeps reading your blog are PROBABLY reading it in a reader, and if they’re not, they should be, okay?

As such, each and every time you post they ONLY see what’s published in that specific blog post.  They DON’T see your beautiful ‘About me’ section with your name and cute mug.

If you are trying to grow your blog, or at the very least, trying to connect with your readers, then you want them to see the Post title pop up in their reader, glance at the blog it came from and immediately picture your NAME and your FACE.

From personal experience, blogs with NO name or face are the first ones that get weeded out as my Reader gets FULL.

If you want a super easy signature, you can make one at my live signature.  It’s easy.  It’s free.  But it’s strictly text only.

Here’s TEN easy Steps on how to make your own CUSTOMIZED signature WITH any font you downloaded,  AND we can add a cute little graphic or two as well for some extra pop.

I promise.  It’s EASY PEASY!

Step 1… Go to pixlr.com.  {Free, easy, no download or login.}  Choose Create your Own Image.

createnewimage2

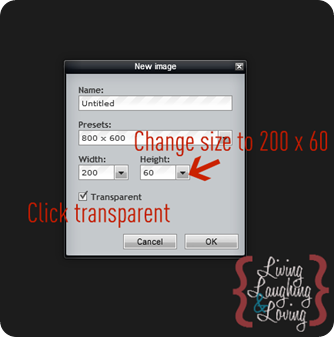
Step 2… Change the size to something around 200 x 60.  Make sure to click transparent.

changesize2

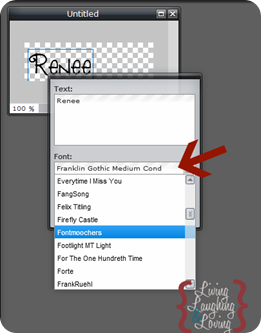
Step 3… Click the “A” to add text.

pixlr font 2

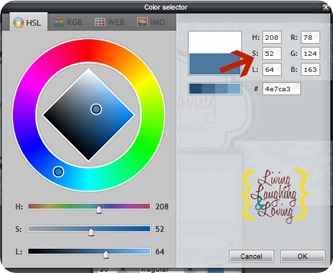
Change your font and color

choosefont2

pixlr color 2

Step 4… Save!

saveaspng2

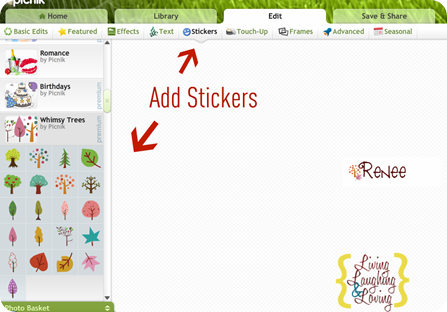
Step 5… Upload your new sig to the amazing Picnik and add some “stickers” or graphics to your image.

addpicnikstickers2

A lot of picnik’s features are FREE though they do have some pretty sweet paid features which I happen to HEART.  I’m totally a picnik lover.  It’s seriously open on my computer ALL the TIME!

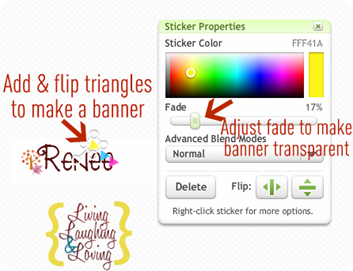
You can even add and rotate a few triangle shapes and make your own nifty & chic banner.

fadecolorin picnik2

You can even adjust the fade to make your signature show through your banner.  :)

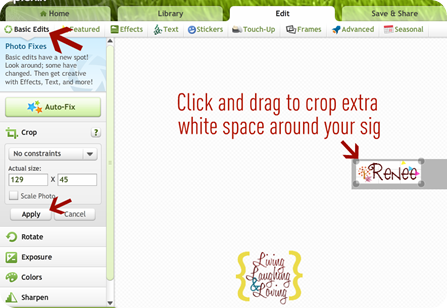
Step 6… Now go to Basic Edits and Crop all the extra white space around your image.

crop2

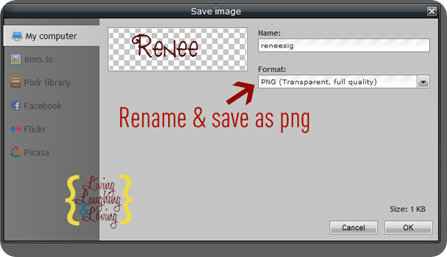
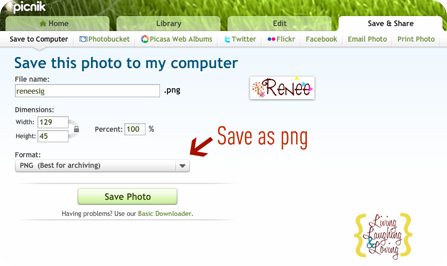
Step 7… Save as png.

saveas a png2

Wala!

reneesig2

Step 8… Open your sig in Photobucket and copy the html code.

copyhtml2

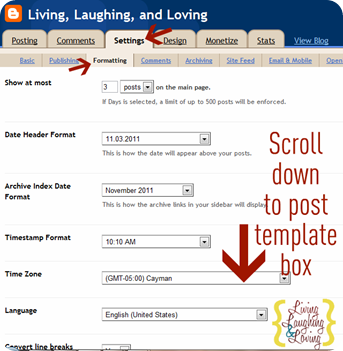
Step 9… We’re almost done!! Add your Sig Html code to your Blog!  In blogger, go to Design, then Settings, and Formatting.

settings formatting2

Scroll down to the Post Template Box.

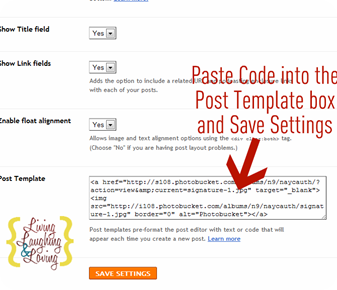
Step 10… Right click and Paste your code into the box and Save Settings.

pastehtmlcode2

Your new and fabulous CUSTOMIZED signature will now appear automatically on ALL your new posts.  They WON’T show up on OLDER posts already published, fyi.

You can also follow this tutorial on how to add your signature to EVERY blog post here… Even ones ALREADY published, BUT if you also have Link Within, your signature will show up BELOW the Link Within thumbnails which I didn’t happen to prefer.

That’s it.  You’re done!!  Ten piece of cake steps and you’ve got yourself a totally rad customized signature!!

Don’t forget to check back soon for the next installment of our Beautify your Blog DIY Style Series!!

What do you think???  I’d love to hear if you’re planning to give this tutorial a shot!!

::Sometimes I link to Weekend Bloggy Link up, Tatertots & Jello, House of Hepworths, Delightful Order, Bowl Full of Lemons, Organize & Decorate Everything, This Chick Cooks, Funky Junk Interiors, Craft Envy, Reasons to Skip the Housework, Somewhat Simple, Shabby Creek Cottage, No Minimalist Here, Skip to my Lou, Fingerprints on the Fridge, CRAFT,Today’s Creative Blog, and Someday Crafts. You should check ‘em out!!::

smiley_face_bw free_thumb

Photobucket

40 Responses to Beautify your Blog Diy Style… A Custom Sig!
  1. Kristi
    November 4, 2011 | 12:28 pm

    I've been starring all these posts in google reader, and at some point I'll get around to incorporating your awesome suggestions. Hopefully sooner than later! Thanks for the great tips.

  2. Amy
    November 4, 2011 | 2:12 pm

    Thanks. I have not had a chance to play with the header one, but it is next on my to do list! Love it! I designed my signature, but I think I might go back and change it for a Thanksgiving them. Then, it can be Christmas.. LOL.

  3. Christina
    November 4, 2011 | 5:46 pm

    so how do I add it in wordpress, huh?? ;) At least I know how to create it, I am sure I can figure out how to add it to my blog. :)

    so in your opinion even on my coupon site should I have a signature? "Print this $0.50 coupon" – then a cutesy signature?? :)

  4. Grace InAZ
    November 4, 2011 | 10:16 pm

    Thanks for the step-by-step easy instructions. I will give it a try.
    I am a new follower. I hope you’ll follow my blog, too. Growing Old With Grace http://growing-old-with-grace.blogspot.com/

  5. rebekahdawn
    November 5, 2011 | 2:22 am

    I'd also like to know if this will work on wordpress.
    I'm considering switching back to blogger because wordpress is so limited.

  6. Funky Junk Interiors
    November 5, 2011 | 2:46 am

    Ok, I've had a signature forever but never thought to add the logo to it! You are sooo smart! Will be mulling this one over. :)

    Great post!

    Donna

  7. Kim @ Sand and Sisal
    November 5, 2011 | 11:22 am

    Great post! I just always signed my name at the bottom of each post but I love the idea of adding graphics to it! I just started using picnik this week, so there's still alot to explore!

  8. Holly
    November 5, 2011 | 6:28 pm

    You have totally convinced me to add a signature. :) I'll be playing around with picnik and pixlr today. Thanks for the super tutorial!

  9. Suzy
    November 6, 2011 | 2:55 am

    Great post and perfect instructions. Enjoy your day.

  10. Paula
    November 6, 2011 | 11:23 am

    Your instructions make this seem so easy!

  11. Sarah
    November 7, 2011 | 2:15 am

    Yea! I did it! Thanks for the instructions…you may have read my comment on your other post today but I've just discovered your blog and am LOVING it! Hitting the hay now but as a new blogger, looking forward to reading more of your blogging tips and learning how to "beautify my blog"! :)

  12. Sparkling
    November 8, 2011 | 2:25 am

    I am so going to get to work on this. It seems pretty straightforward and I want to know mroe about photobucket and picnic so this is a great reason to figure them out!

  13. Laine
    November 8, 2011 | 11:53 am

    Hopefully I can play around with this soon. Thanks for the easy instructions!

  14. Jen Kesler
    November 8, 2011 | 7:24 pm

    Thanks for sharing that!

  15. Kimberly
    November 9, 2011 | 4:28 pm

    Thank you for making this so easy!! I just did it! You're awesome!!

  16. Shiloh
    November 9, 2011 | 4:42 pm

    Thanks so much for this. It's really helpful. Definitely on my to do list.:)

  17. Amanda
    November 9, 2011 | 8:34 pm

    Thanks for posting this, I've just done my sig, hopefully I've not messed it up and it will show up on my next post!

  18. Shasta @ intheoldroad
    November 10, 2011 | 4:27 am

    I just found your blog via The 36th Avenue's link party. I'm a newbie blogger and LOVE finding great tips like yours. I'm going to give my blog design some tlc soon with your tips. THANK YOU!
    Shasta (your newest follower:)

  19. Rece
    November 11, 2011 | 10:41 pm

    Thanks!!

  20. morenumerousthansand
    November 14, 2011 | 2:35 am

    Awesome post. I need to do this for my blog!

  21. AJ
    November 16, 2011 | 8:30 pm

    I've been wondering how to put a signature on my posts, thanks so much!

  22. Kimberly @ The Brown Eyes Have It
    November 17, 2011 | 4:52 am

    Yeah! This was the next thing on my "blog improvement list". I can't wait to try this out. This series has been so helpful, thanks!

  23. Lori
    December 28, 2011 | 8:14 pm

    Thanks so much for your series!
    I have tried this one and the watermark and I am having the same problem with both…it seems to be transparent until I add the sticker in Picnik. Then for some reason it has a white box. Am I missing a step?
    Thanks again for the instructions! I am loving this!!!! :)

  24. Natalie
    January 8, 2012 | 8:10 am

    I did it!!!!! Thank you sooooo much… Nat

  25. Sarah, The Busy Lady
    January 21, 2012 | 1:00 am

    oh my god! i love it! your tutorials are awesome and step by step I am making my blog even better with your help!!!

  26. Sugar Glitz
    January 24, 2012 | 8:18 am

    I LOVE your simple, easy, and beautifully visual step by step instructions. HOWEVER, my signature and now my side bar images are showing up with a box (frame) around them. I did not add a frame in picnik and I also did the image as 'transparent' in pixlr. I can't figure out how this is happening. Please help!! TY <3

  27. Sugar Glitz
    January 25, 2012 | 10:07 am

    Thank you for the emails and the link to help with my signature problem <3 I haven't had time to check it out but will this week!! Thanks again for your help <3

  28. Jelli
    February 15, 2012 | 8:34 pm

    Thanks for this. I tried another tutorial using different HTML searches, but never found any similar line in my template. This worked so easily!

  29. Melinda Hileman
    March 9, 2012 | 9:15 am

    Just wanted to let you know that Picnik isn’t showing your signature image in this post, it just has their name. Might want to fix that since that’s what this post is about!

    • Renee
      March 9, 2012 | 9:25 am

      Thanks for letting me know! But I’m not seeing the picnik name you mentioned. Is it showing for you right underneath the smiley face under the linky parties? That’s where the sig is showing up for me. So weird!

  30. Melinda
    March 9, 2012 | 1:50 pm

    I figured it out – my ad block program blocked the image and just had the site name! That’s weird that it’s flagged as an ad!

    Do you have instructions for doing this in WordPress? If not, I can help you write it!

  31. […] Sensational Signature w/Graphics […]

  32. Homeroad
    March 18, 2012 | 9:00 am

    Thank you! I now have a beautiful signature on my blog!
    Susan
    Homeroad

  33. Erin's 2 Cents
    March 19, 2012 | 10:54 am

    Thank you so much for sharing your skills! You are really helping me improve my blog, and your directions are so easy to follow.

  34. […] Sensational Signature w/Graphics […]

  35. Shelly Nakabayashi
    October 16, 2012 | 2:33 pm

    Thank you so much for this post. I have been struggling with a white box around my siggy and no other tutorial worked. Finally, using the pixrl website did the trick. So thank you so much!

  36. Raquel
    January 19, 2013 | 1:06 am

    Cool,but how do I do this for wordpress ?

  37. Amy
    March 21, 2013 | 11:48 pm

    I just did this — thank you :) I am still seeing a border on mine – I edited in PicMonkey — any tips? Thanks!

  38. How To Blog | Living Laughing & Loving
    April 3, 2013 | 6:02 am

    […] like this, but it also helps foster loyalty if you semi regularly include pictures of yourself and a signature to your blog posts.  I can’t tell you how many blogs I have in my reader that I am reading where […]

  39. Joi Body
    April 6, 2014 | 10:23 am

    Hi! I must say this was a great tutorial. I am new to blogging and I was looking up things every blog should have. So I knew I needed a signature and Pinterest brought me to the right place! Thank you so much!

    P.S. Your blog looks great. Hopefully mine will get there one day.

Beautify your Blog Diy Style… A Custom Sig!

beautifyyourblog

{See Part 1 on Fab Fonts & Part 2 on Delicious Dreamy Headers here…}

I mentioned in my Blogging 101 post that it is pretty important to have a signature on all your posts you work so hard to pump out.

Why?

Well, if you don’t feel like clicking over, I’ll tell you again.

Most peeps reading your blog are PROBABLY reading it in a reader, and if they’re not, they should be, okay?

As such, each and every time you post they ONLY see what’s published in that specific blog post.  They DON’T see your beautiful ‘About me’ section with your name and cute mug.

If you are trying to grow your blog, or at the very least, trying to connect with your readers, then you want them to see the Post title pop up in their reader, glance at the blog it came from and immediately picture your NAME and your FACE.

From personal experience, blogs with NO name or face are the first ones that get weeded out as my Reader gets FULL.

If you want a super easy signature, you can make one at my live signature.  It’s easy.  It’s free.  But it’s strictly text only.

Here’s TEN easy Steps on how to make your own CUSTOMIZED signature WITH any font you downloaded,  AND we can add a cute little graphic or two as well for some extra pop.

I promise.  It’s EASY PEASY!

Step 1… Go to pixlr.com.  {Free, easy, no download or login.}  Choose Create your Own Image.

createnewimage2

Step 2… Change the size to something around 200 x 60.  Make sure to click transparent.

changesize2

Step 3… Click the “A” to add text.

pixlr font 2

Change your font and color

choosefont2

pixlr color 2

Step 4… Save!

saveaspng2

Step 5… Upload your new sig to the amazing Picnik and add some “stickers” or graphics to your image.

addpicnikstickers2

A lot of picnik’s features are FREE though they do have some pretty sweet paid features which I happen to HEART.  I’m totally a picnik lover.  It’s seriously open on my computer ALL the TIME!

You can even add and rotate a few triangle shapes and make your own nifty & chic banner.

fadecolorin picnik2

You can even adjust the fade to make your signature show through your banner.  :)

Step 6… Now go to Basic Edits and Crop all the extra white space around your image.

crop2

Step 7… Save as png.

saveas a png2

Wala!

reneesig2

Step 8… Open your sig in Photobucket and copy the html code.

copyhtml2

Step 9… We’re almost done!! Add your Sig Html code to your Blog!  In blogger, go to Design, then Settings, and Formatting.

settings formatting2

Scroll down to the Post Template Box.

Step 10… Right click and Paste your code into the box and Save Settings.

pastehtmlcode2

Your new and fabulous CUSTOMIZED signature will now appear automatically on ALL your new posts.  They WON’T show up on OLDER posts already published, fyi.

You can also follow this tutorial on how to add your signature to EVERY blog post here… Even ones ALREADY published, BUT if you also have Link Within, your signature will show up BELOW the Link Within thumbnails which I didn’t happen to prefer.

That’s it.  You’re done!!  Ten piece of cake steps and you’ve got yourself a totally rad customized signature!!

Don’t forget to check back soon for the next installment of our Beautify your Blog DIY Style Series!!

What do you think???  I’d love to hear if you’re planning to give this tutorial a shot!!

::Sometimes I link to Weekend Bloggy Link up, Tatertots & Jello, House of Hepworths, Delightful Order, Bowl Full of Lemons, Organize & Decorate Everything, This Chick Cooks, Funky Junk Interiors, Craft Envy, Reasons to Skip the Housework, Somewhat Simple, Shabby Creek Cottage, No Minimalist Here, Skip to my Lou, Fingerprints on the Fridge, CRAFT,Today’s Creative Blog, and Someday Crafts. You should check ‘em out!!::

smiley_face_bw free_thumb

Photobucket

40 Responses to Beautify your Blog Diy Style… A Custom Sig!
  1. Kristi
    November 4, 2011 | 12:28 pm

    I've been starring all these posts in google reader, and at some point I'll get around to incorporating your awesome suggestions. Hopefully sooner than later! Thanks for the great tips.

  2. Amy
    November 4, 2011 | 2:12 pm

    Thanks. I have not had a chance to play with the header one, but it is next on my to do list! Love it! I designed my signature, but I think I might go back and change it for a Thanksgiving them. Then, it can be Christmas.. LOL.

  3. Christina
    November 4, 2011 | 5:46 pm

    so how do I add it in wordpress, huh?? ;) At least I know how to create it, I am sure I can figure out how to add it to my blog. :)

    so in your opinion even on my coupon site should I have a signature? "Print this $0.50 coupon" – then a cutesy signature?? :)

  4. Grace InAZ
    November 4, 2011 | 10:16 pm

    Thanks for the step-by-step easy instructions. I will give it a try.
    I am a new follower. I hope you’ll follow my blog, too. Growing Old With Grace http://growing-old-with-grace.blogspot.com/

  5. rebekahdawn
    November 5, 2011 | 2:22 am

    I'd also like to know if this will work on wordpress.
    I'm considering switching back to blogger because wordpress is so limited.

  6. Funky Junk Interiors
    November 5, 2011 | 2:46 am

    Ok, I've had a signature forever but never thought to add the logo to it! You are sooo smart! Will be mulling this one over. :)

    Great post!

    Donna

  7. Kim @ Sand and Sisal
    November 5, 2011 | 11:22 am

    Great post! I just always signed my name at the bottom of each post but I love the idea of adding graphics to it! I just started using picnik this week, so there's still alot to explore!

  8. Holly
    November 5, 2011 | 6:28 pm

    You have totally convinced me to add a signature. :) I'll be playing around with picnik and pixlr today. Thanks for the super tutorial!

  9. Suzy
    November 6, 2011 | 2:55 am

    Great post and perfect instructions. Enjoy your day.

  10. Paula
    November 6, 2011 | 11:23 am

    Your instructions make this seem so easy!

  11. Sarah
    November 7, 2011 | 2:15 am

    Yea! I did it! Thanks for the instructions…you may have read my comment on your other post today but I've just discovered your blog and am LOVING it! Hitting the hay now but as a new blogger, looking forward to reading more of your blogging tips and learning how to "beautify my blog"! :)

  12. Sparkling
    November 8, 2011 | 2:25 am

    I am so going to get to work on this. It seems pretty straightforward and I want to know mroe about photobucket and picnic so this is a great reason to figure them out!

  13. Laine
    November 8, 2011 | 11:53 am

    Hopefully I can play around with this soon. Thanks for the easy instructions!

  14. Jen Kesler
    November 8, 2011 | 7:24 pm

    Thanks for sharing that!

  15. Kimberly
    November 9, 2011 | 4:28 pm

    Thank you for making this so easy!! I just did it! You're awesome!!

  16. Shiloh
    November 9, 2011 | 4:42 pm

    Thanks so much for this. It's really helpful. Definitely on my to do list.:)

  17. Amanda
    November 9, 2011 | 8:34 pm

    Thanks for posting this, I've just done my sig, hopefully I've not messed it up and it will show up on my next post!

  18. Shasta @ intheoldroad
    November 10, 2011 | 4:27 am

    I just found your blog via The 36th Avenue's link party. I'm a newbie blogger and LOVE finding great tips like yours. I'm going to give my blog design some tlc soon with your tips. THANK YOU!
    Shasta (your newest follower:)

  19. Rece
    November 11, 2011 | 10:41 pm

    Thanks!!

  20. morenumerousthansand
    November 14, 2011 | 2:35 am

    Awesome post. I need to do this for my blog!

  21. AJ
    November 16, 2011 | 8:30 pm

    I've been wondering how to put a signature on my posts, thanks so much!

  22. Kimberly @ The Brown Eyes Have It
    November 17, 2011 | 4:52 am

    Yeah! This was the next thing on my "blog improvement list". I can't wait to try this out. This series has been so helpful, thanks!

  23. Lori
    December 28, 2011 | 8:14 pm

    Thanks so much for your series!
    I have tried this one and the watermark and I am having the same problem with both…it seems to be transparent until I add the sticker in Picnik. Then for some reason it has a white box. Am I missing a step?
    Thanks again for the instructions! I am loving this!!!! :)

  24. Natalie
    January 8, 2012 | 8:10 am

    I did it!!!!! Thank you sooooo much… Nat

  25. Sarah, The Busy Lady
    January 21, 2012 | 1:00 am

    oh my god! i love it! your tutorials are awesome and step by step I am making my blog even better with your help!!!

  26. Sugar Glitz
    January 24, 2012 | 8:18 am

    I LOVE your simple, easy, and beautifully visual step by step instructions. HOWEVER, my signature and now my side bar images are showing up with a box (frame) around them. I did not add a frame in picnik and I also did the image as 'transparent' in pixlr. I can't figure out how this is happening. Please help!! TY <3

  27. Sugar Glitz
    January 25, 2012 | 10:07 am

    Thank you for the emails and the link to help with my signature problem <3 I haven't had time to check it out but will this week!! Thanks again for your help <3

  28. Jelli
    February 15, 2012 | 8:34 pm

    Thanks for this. I tried another tutorial using different HTML searches, but never found any similar line in my template. This worked so easily!

  29. Melinda Hileman
    March 9, 2012 | 9:15 am

    Just wanted to let you know that Picnik isn’t showing your signature image in this post, it just has their name. Might want to fix that since that’s what this post is about!

    • Renee
      March 9, 2012 | 9:25 am

      Thanks for letting me know! But I’m not seeing the picnik name you mentioned. Is it showing for you right underneath the smiley face under the linky parties? That’s where the sig is showing up for me. So weird!

  30. Melinda
    March 9, 2012 | 1:50 pm

    I figured it out – my ad block program blocked the image and just had the site name! That’s weird that it’s flagged as an ad!

    Do you have instructions for doing this in WordPress? If not, I can help you write it!

  31. […] Sensational Signature w/Graphics […]

  32. Homeroad
    March 18, 2012 | 9:00 am

    Thank you! I now have a beautiful signature on my blog!
    Susan
    Homeroad

  33. Erin's 2 Cents
    March 19, 2012 | 10:54 am

    Thank you so much for sharing your skills! You are really helping me improve my blog, and your directions are so easy to follow.

  34. […] Sensational Signature w/Graphics […]

  35. Shelly Nakabayashi
    October 16, 2012 | 2:33 pm

    Thank you so much for this post. I have been struggling with a white box around my siggy and no other tutorial worked. Finally, using the pixrl website did the trick. So thank you so much!

  36. Raquel
    January 19, 2013 | 1:06 am

    Cool,but how do I do this for wordpress ?

  37. Amy
    March 21, 2013 | 11:48 pm

    I just did this — thank you :) I am still seeing a border on mine – I edited in PicMonkey — any tips? Thanks!

  38. How To Blog | Living Laughing & Loving
    April 3, 2013 | 6:02 am

    […] like this, but it also helps foster loyalty if you semi regularly include pictures of yourself and a signature to your blog posts.  I can’t tell you how many blogs I have in my reader that I am reading where […]

  39. Joi Body
    April 6, 2014 | 10:23 am

    Hi! I must say this was a great tutorial. I am new to blogging and I was looking up things every blog should have. So I knew I needed a signature and Pinterest brought me to the right place! Thank you so much!

    P.S. Your blog looks great. Hopefully mine will get there one day.